
JavaScript Hello World | Beginner Script Tag Tutorial
This JavaScript Hello World tutorial shows how a small script connects to an HTML page, what its output means, and how to test it without breaking the rest of your page.
Weighing in at 0 pounds (it’s free) in the lightweight category is Javascript, a scripting language. No, it’s not Java. Javascripting is entirely a different enclave. Don’t get confused there. Java is a complex programming language. JS or Javascript on the other hand, is a much simpler scripting language that your browser can tap into.
Languages like Java generally require you to download JRE, JDK etc. Au contraire, with Javascript you don’t have to download anything. It is there. Yes, it has always been there with you!
It is there running on your browser, your phone, everywhere. Now you know why it becomes a foremost choice when organizations are selecting a programming or scripting language for their work on the web.
About Your First Browser Script
Javascript helps you do all the cool stuff. That’s why it relates to me the most. Where’s that sunglasses emoji? Can’t find it. 😎 There we go!
So if you are wondering why do you need Javascript for, when you have a good thing going on with HTML, well hear me out. We use Javascript in HTML. Javascript literally completes HTML. The latter is incomplete without some Javascripting elements to fill it up. Look at it this way:
Imagine you are creating a robot. If you bring together all its body parts, then you have simply gone HTML on it. Now that you provide it with eyes to see, ears to hear, nose to smell, then you are talking Javascripting, meaning providing functionality to it. Well, eventually when you are done with the functionality bit, I don’t know, you throw in some clothes on it, well that’s where you get CSS. Clear? Moving on.
As fond as I am to come up with “Hello World” via a programming language, using JS to print that is exactly what we are going to learn here.
So up until now we had learnt how to create a hello world page with notepad, now we will learn how to print hello world using Javascript. Let’s get cracking!
JavaScript Hello World with a Script Tag
We must first establish how a javascript is written in HTML. Just like we used tags for HTML, here too there’s a tag that we need to remember:
<script>
And following the cardinal rule about opening and closing things – what’s opened, shall always be closed; the closing tag for JS is:
</script>
You put anything between this and it gets treated like a Javascripting language by your browser. So, with that knowledge, we can proceed further with the creation of an HTML file.
Steps to Display JavaScript Hello World
Step 1: Create a separate folder for JS on your system. Coz order is everything when you are learning new things. Here we will experiment with Javascript-related stuff. So, in that folder right click and create a new text document or notepad file.

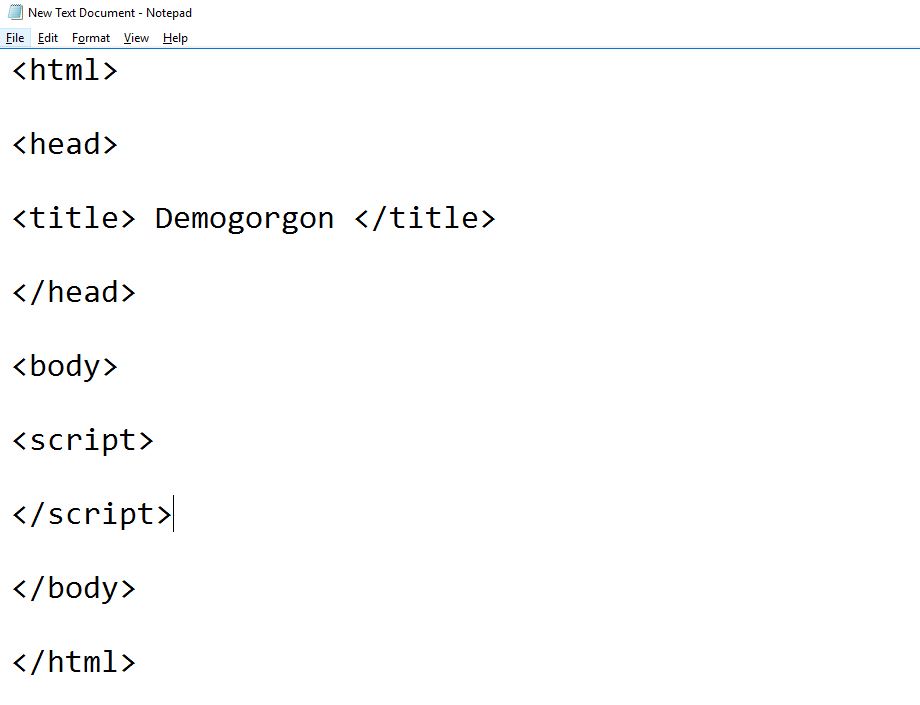
Step 2: Open it and as learned from previous Chapters of HTML (Don’t tell me you forgot!), prepare the basic setup. It should look something like this:

You can lose the Demogorgon and choose any title you want. That character of Stranger Things has become a thing of the past now.
Step 3: Now since JS requires <script> tag to be inserted, we can’t really do without them. So let’s do that. Remember you can use it either between <head> or <body> tags. I am doing this between the <body> tag:
Display Commands in JS
Anything that goes in between the <script> tags, the system treats it as a JS element. So, if you wish to simply write “Hello World” in there, you can’t just write Hello World between the scripts and expect your browser to print it. Go ahead and try that. Nothing would happen. You will get a blank page as a result. In JS, the print command or data display can be done in 4 different ways:
- window.alert()
- document.write()
- innerHTML
- console.log()
We shall be focusing on the second method that is the document.write() command from above, herein.
Step 4: The document. write() command tells the browser to display whatever comes between its brackets. If there is a string you are trying to show make sure you put it between double inverted commas. If there are numbers entailed you can lose the quotes. Go ahead and complete the rest:

Step 5: Save the file in .html extension giving it a name you prefer. You were already briefed on this, don’t be so dumb C’mon! If you can’t remember, then go back to the HTML chapter 1 and check.
Once you are done, run it on your browser. This is what you should be getting:

Voila! There it is! Favourite two words!
Repeat the procedure, mess around experiment with document.write() to get different results. For e.g. try putting numbers in there. Say, add 5 and 8 together:

You should be getting the following result when you save the file and try opening it in the browser:

Now that we know how to display Javascript Hello World, we will focus on learning other aspects of Javascript in the upcoming chapters. Till then, go party hard! You have learned something soldier. You have earned it.
Checking Your First Code
Modern note: document.write() is useful for understanding old examples, but do not use it after a page has loaded because it can replace the document. For a first safe test, place console.log("Hello, world!") in your script and open the browser developer console. Keep JavaScript in a script file or in a script tag near the end of the body so the page structure is available before the code runs. Read errors carefully: the console normally reports a filename and line number, which makes a missing quote, bracket, or closing script tag much easier to find. Save the file, refresh the page, and change one small thing at a time while you learn. This simple loop builds the habit of testing a clear expected result before moving to functions, events, or more complicated browser code.
Start with the HTML structure in this Notepad website tutorial if you need a clean page before adding JavaScript.


1 Response
[…] is advisable you follow the standard learning routine by finishing Chapter 1 of Javascript first before arriving here. Already done? Whoa, you are a tiger! Let’s claw in, shall […]