Multithreading in Java | Multithreaded programming – Part 1
Did you know Java supports multithreaded programming? Multithreading in Java is a multitasking scenario where your program could do more than one thing simultaneously. So a multithreaded program would be something that will have two or more parts to it and both or all these parts will run concurrently.
You must understand the types of multitasking before proceeding with multithreading in java. There are two types of multitasking:
- Process-based
- Thread-based
A process is nothing but a program that is executing. So your system letting you open both MSPaint and Google Chrome at the same time, and letting you work on them as you please is an example of a process based multitasking. Here a program is the smallest unit of code.

For thread based multitasking, the smallest unit of code is nothing but a thread. So you can draw something in MSPaint and print it at the same time. Hence, a thread is supposed to deal with the minutia of programs.
That takes us to the cardinal question:
What is a Thread?
A thread is nothing but an independent path followed while executing a program. Every Java program has one thread by default. Guess, which one’s that?
Yes, the thread invoked by calling the main() method. It is called main thread.
It is the thread from which other thread arises. Main is often the last thread to execute because it has to perform many shutdown actions.
The benefit of multithreading in Java is the fact that one thread doesn’t have to depend on another for its execution. They can each independently coexist without affecting each other’s result. So say one thread pauses, the others could still keep on getting executed. Earlier in a single thread environment, this wasn’t possible. Other threads were supposed to wait for the first one to execute. The precise reason why multithreading in Java came into existence.
There are different states of a thread in Java. A thread could be in any of the following states but could be in only one state at a given time:
- New
- Runnable
- Blocked
- Waiting
- Timed Waiting
- Terminated
Multithreading in Java | Priorities, Synchronization and Messaging
Every thread is tacked with a priority number. It is in the form of integer and is relative to other threads. The priority of these threads are taken into account so as to decide when to move to the next running thread. This concept of switching from one running thread to another is known as context switching.
Use of multithreading in Java makes everything asynchronous. There must be a way to make your programs synchronous. So that in a program to write to a file then read, the reading thread should wait for the writing thread to finish before beginning to read. To enforce such synchronicity, Java makes use of a synchronization process known as the monitor.
Monitor is more like a small box that has the capacity to hold just one thread. So while one thread is being executed, the control stays with it until it terminates and gives the chance to the remaining threads, and so on. In Java, each object has its own implicit monitor which is automatically entered when object’s synchronized method is called. Till the time the thread is inside that synchronized method, no other thread can make the call.
Java has its own messaging system to communicate with threads. Calls to predefined methods are made. Using Java’s messaging system a thread can enter a synchronized method of an object, and then wait till there’s another thread explicitly notifying it to come out.
Don’t worry things will make more sense when we actually work on it. Let’s just take baby steps for now and learn about multithreading in Java.
Thread Class – currentThread()
Multithreading in Java is literally built around Thread Class and Runnable interface. There are many predefined methods in the Thread class that come in handy to get certain thread related jobs done.
Did you know you could control the main thread using a Thread object?
There is this static method called currentThread() of Thread class, which can help you to give a reference. Once you have reference you can control it like a normal thread.
Let’s see how. Create a new class, and in the main() method call the currentThread() and assign it to a reference.
Thread t = Thread.currentThread();
System.out.println(t);
If you run the program as is you will get the following result:
Thread[main,5,main]
It is nothing but the name of the thread, its priority, and the name of its group in that order.
You can choose to change the name of the thread.
You can use the setName() method for that:

Now if you will run the above program you will get the following result:
Thread[main,5,main]
Thread[Flying,5,main]
You can see that the name of the thread has been changed from main to Flying.
If you just want the name of the thread to show, you can make use of getName() method of Thread class. Simply use the following and see the difference:
t.getName();
Using Sleep Method
Another important part of multithreading in Java is the sleep method.
Did you doze off already?
There is this method of Thread class called sleep that we can use to accomplish a delay or a pause while execution. The sleep method takes arguments in milliseconds and depicts the amount of delay you wish to have.
The general form of sleep method is:
static void sleep (long milliseconds) throws InterruptedException
Let’s wrap this program around with a for loop which executes in a jiffy. We will try to see how each result gets displayed using the sleep method.

We have to handle Interrupted Exception that it might throw. Don’t know about exceptions? Go back and learn about them.
I have put 1000 milliseconds as the argument to sleep().
Now if you will run the above program you will see that the result for i will be displayed after a 1 second pause:
Thread[main,5,main]
Thread[Flying,5,main]
0
1
2
3
4
5
6
7
8
9
All of the above numbers might have trickled down slowly.
This takes us to the most important thing about learning about multithreading in Java.
How to Create a Thread
There are two ways to create a new thread. They are namely:
- By implementing Runnable interface
- By extending Thread class
First we will see how Runnable interface can be used to create a thread. Primarily because Runnable is an interface which only involves implementing just one single method named run(). For Thread class there are tons of methods in there, and it doesn’t seem right to extend just one method run() out of it. So many prefer the usage of Runnable Interface to create a thread.
Implementing Runnable Interface
All we have to do here is implement Runnable interface, and implement its run() method. We need to define our code inside the run() method.
run() method will act like just like main() and be treated as another entry point. It will end once run() returns.
We are going to make use of one of the constructors of Thread that goes something like this:
Thread (Runnable threadObject, String Name);
where threadObject is the instance of a class that implements Runnable.
However, even though our new thread gets created with the above constructor, it will not start until we use start() method. Basically it is the start() method that executes a call to run() method.
Without wasting much time let’s try to understand this with the help of a program.
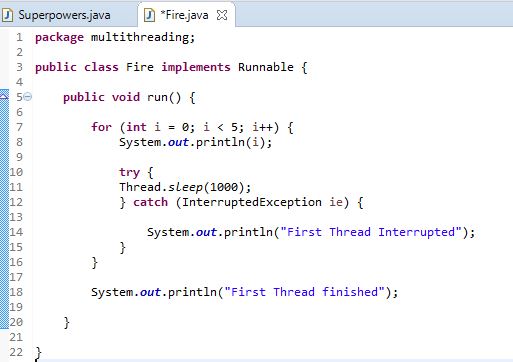
Here’s our class that implements Runnable. Remember we need to implement run() method here:

I have created a thread scenario using Thread.sleep(1000) to execute this thread. This would serve as our first thread.
Handle Exceptions
Since we are using Thread.sleep() we need to handle the InterruptedException as well.
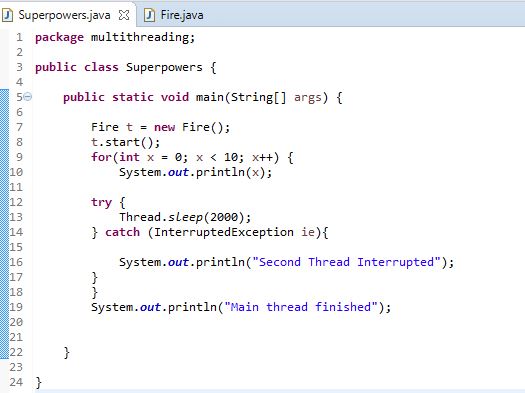
In our main method which will serve as another thread entry point, we will create an instance of Thread class and call the constructor to head to Runnable. Remember without the usage of start() our thread wouldn’t start.
 In the above program, we have first called the constructor by creating an instance of a class that implements Runnable and assigned the thread name. Then we have used start() to basically give control to our method run().
It will give the control to Fire class. The loop there runs first, and then it exits by coming back to main() method executing the remaining stuff there.
NOTE: It is preferable main thread should finish last and hence the delay time I have kept for main is 2000 milliseconds. Older system used to hang if it were the other round.
Both threads run simultaneously sharing CPU, until both loops are completely finished. Here’s the result that I got:
0
0
1
2
1
3
4
2
First Thread finished
3
4
5
6
7
8
9
Main thread finished
You may get a different result since it depends on your CPU task load.
NOTE: A thread can run only once. You can’t rerun a thread. It will give you IllegalThreadStateException.
Implementing Runnable: Using a Constructor
You can alternatively create a constructor to give main() or your user minimal stuff to handle. To do that you just need to create a constructor of your class and take all the action there.
Put the following code to instantiate and call start() method in your constructor:
Thread t = new Thread(this, "First Thread");
t.start();
We can see this taking form in our example:
 Notice the use of this in the constructor call. It lets your JVM know that you wish to call run() method on this object.
Now with every implementation covered in Fire’s constructor, we are left with the calling is all:
 Now the main() method just has to make a constructor call. Rest will all be taken care of by the constructor. You will get the same result.
Extending Thread Class
The second method to achieve multithreading in Java is via extending the Thread class and then creating an instance of it. The class that is extending the Thread class should then override the run() method which will act as the entry point for the new thread. Even here we need to call the start() method in order to begin the thread execution.
Slapping this on an example:
 All we have to do is extend Thread class, and implement its run method to suit our thread.
Now time to create the instance of our Extending class and call start() method to execute the above thread:

If you run the above program you will get a different result from this because of processor preferences. I got this:
0
0
1
2
1
3
4
2
First Thread finished
3
4
5
6
7
8
9
Main thread finished
Extending Thread: Using a Constructor
We could also choose to create a constructor here where to call the start() method:

To make sure Fire() constructor is picked up now we have to just instantiate Fire() in main() method:
 You will get the same result if you run it depending upon your CPU’s availability.
How to Determine a thread has finished? | isAlive() and join()
As mentioned earlier, main thread should be the last one to finish. But to ensure that happens every time providing a high delay time doesn’t seem to be a practical approach. We could instead make use of isAlive() or join() methods of Thread class.
While isAlive() is a Boolean method that tells you whether or not your thread is still running, join() is a much more useful method since it waits for a thread to complete before joining the thread to the concerned thread and continuing.
If we take a look at the above example:

And try to call our threads and then use join() method to establish that our threads execute one after the other:
 Notice that we need to use the thread reference to call the classes isAlive() and join() so we need to create an instance of our class first then use the dot operator to make the call.
Running the above program gave me the result as:
true
0
Waiting a bit
1
2
3
4
First Thread finished
0
1
2
3
4
5
6
7
8
9
false
Main thread finished
Another Example of Join()
If you want a thread to finish first and then only move on to the next thread, we make use of join().
Here’s a much easier example to make you understand the concept of join.
We have a class called Fire implementing Runnable and with the method run().

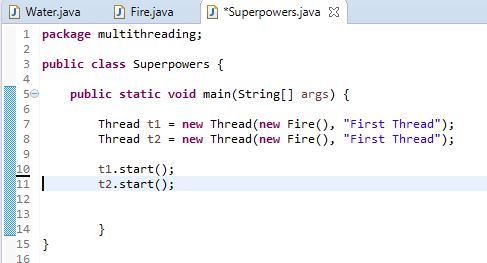
Here’s our main method to call the two threads:

Now if you will run the above program without adding join() here’s what you will get:
0
0
1
1
2
2
3
3
4
4
5
5
6
6
7
7
8
8
9
9
As you can see both the threads ran simultaneously. That’s one typical example of multithreading in Java
Now if you make use of join() method:

it will let the first thread complete before moving on to the second thread.
NOTE: join() gives out Interrupted Exception so you need to catch it.
The result will now become:
0
1
2
3
4
5
6
7
8
9
0
1
2
3
4
5
6
7
8
9
Thread Priorities – getPriority(), setPriority()
In order to get priority of a thread we can call the getPriority() method of Thread class. If we add this to our code, we can easily get the priority of our thread:
f.t.getPriority();
The code that I have added is:
System.out.println("Thread priority is " + f.t.getPriority());Running the above gives me the result as:
Thread priority is 5
In order to set priority for a thread we can make use of setPriority() method available in Thread class. The syntax to remember here is:
final void setPriority(int level)
where level is nothing but priority values that range from MIN_PRIORITY to MAX_PRIORITY with the former insinuating a minimum value of 1, while the latter a maximum value of 10. If you wish to put a default value of 5, you can use NORM_PRIORITY as well.
So trying to use them both in an easy example:
 We are going to create two threads providing them names First Thread and Second Thread with 1 and 10 priority each.
 Naturally since the second thread has priority as 10, it will be executed first. So get ready to observe “Second Thread” being depicted first.
When you run the program:
Running thread name is Second Thread
Running thread name is First Thread Running thread priority is 10 Running thread priority is 1
I hope that clears priorities in threads once and for all.
Multithread in Java topic isn’t over yet. There is another crucial topic called Synchronization which we will see in the next chapter.
I am really tired now, let’s take that up in the next lesson. Calling Thread.sleep() method so many times has got me yawning dude!


1 Response
[…] it is important to see what could go wrong without using it. We saw a lot of examples in the previous chapter of multithreading but it wouldn’t hurt to see one […]