
Selenium Reporting Tools | How to Generate Extent Report in Selenium
If you have been working on Selenium TestNG for a while, you already know how reports are generated on it. Some of the inbuilt Selenium Reporting Tools include the one you see owing to TestNG framework’s discretion.
Every time you run a report a test-output folder gets created. You can find it located on the left-hand side in the package explorer, right underneath “Referenced Libraries” of your project.
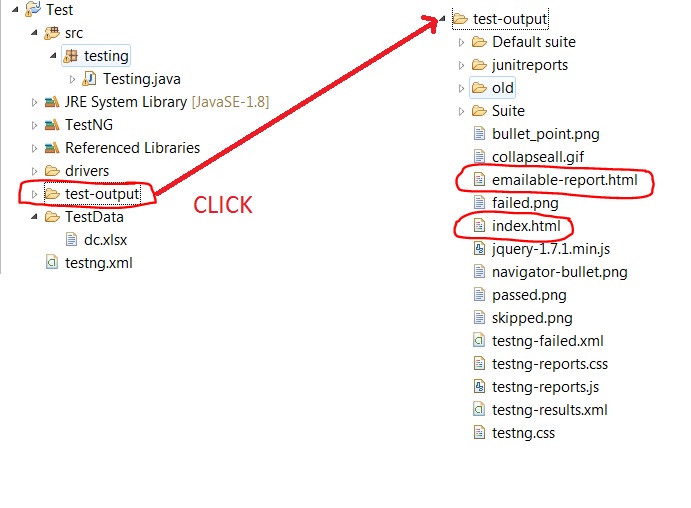
When you flare it open you see that it in the Suite folder there are two files called “index.html” and “emailable-report.html” that will provide you with reports that one could see and learn about how your test cases fared.

All you have to do is right click on it and then choose a web based browser to open it as shown in the figure below:

Selenium Reporting Tools – TestNG
Here’s what index.html file looks like once you open it:

Here’s how emailable-report.html file looks like:

As the name suggests you can email this report for your clients and developers to see and understand what all test cases are failing so that they zero in on the functionality that’s not working.
What’s wrong with the above reports? Just have a look-see.
Even though they serve the purpose, they are not easy on the eyes. They do not look like reports that will make a person happy.
That’s why Extent Reports!
Selenium Reporting Tools – Extent Report
Extent Report is nothing but an HTML reporting library that comes loaded with tons of features that make reporting a lot much better. It retains these awesome execution reports that are not only great to look at but they are also quite useful.
- You can generate Pie charts
- You have the ability to create dynmaic logs.
- Can generate Step by Step Test Case Summary
- Can attach Error Screenshots with report
- You can filter reports based on status
So now that you know all the cool features of Extent Report one of the best Selenium Reporting Tools, it is time to integrate it in your existing Selenium WebDriver.
How to Generate Extent Report in Selenium
In order to get started you need to first make sure that you have the following things already installed on your system:
- Java
- Selenium TestNG
- Extent Report Jars
Downloading Extent Report Jars
I am assuming you already have Java and Selenium TestNG installed on your system. So moving on to the third one directly.
Step 1: Navigate to the following website:
It will open a page up like this. Just click on the version you wish to download.

Alternatively it might open like this too:

Just click on the latest Java version that’s showing.
It will download the extent reports Java version 3.1.3.

Extract it in a folder and remember the location since you are gonna need in the upcoming steps.
Time to configure it in your Selenium Project.
Configuring Extent Report Jar File
Step 2: Navigate to your project in the Package Explorer towards the left hand side, and right click on it, then click on Build Path > Configure Build Path…

Step 3: In the next dialog box click on “Add External Jars…” It will show up in the third tab of “Libraries”.

Step 4: Select the extent report file that you had downloaded in Step 1. Make sure you are selecting a jar file. Selecting a folder doesn’t sometimes work.

NOTE: You might have to actually Add lib folder files as well or it won’t work. Repeat the step 4 and 5 to include the entire lib folder files:

Step 5: Click on Apply and then on OK.

Now that you have integrated it in your report you need to use it in your code for the actual results to show.
NOTE: Alternatively, if you are working on Maven, all you need to do is add its dependency in the pom.xml. The downloading of the jar and all happens automatically there.
Using Extent Reports in your Code
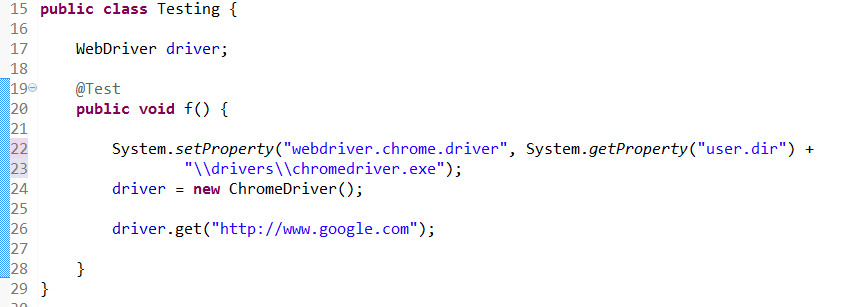
Let’s just take a simple exam of an existing program that navigates to the website of Google. So our existing code looks something like this:
Time to start writing the Extent Reports code now.
Step 6: Let us declare the three important classes that we are going to need to see the extent reports. Let’s declare them globally like this:
ExtentHtmlReporter htmlReporter;
ExtentReports report;
ExtentTest logger;
Step 7: To remove the red error underlines, just place your mouse cursor on each one of the classes and import the following packages:
import com.aventstack.extentreports.ExtentReports;
import com.aventstack.extentreports.ExtentTest;
import com.aventstack.extentreports.reporter.ExtentHtmlReporter;
Now that we have declared these variables, let us use them in our code.
Step 8: Type the following:
htmlReporter = new ExtentHtmlReporter("D:\\reports.html");Here we are specifying the path where we wish to see our extent reports generated at.
But just writing that doesn’t take care of that. We need to use the attachReporter method of ExtentReports class to make sure the reports get attached to the html file.
To do that we will first initialize ExtentReports instance.
Step 9: Type the following:
report = new ExtentReports();
Step 10: Now follow it up by using attachReporter method like this:
report.attachReporter(htmlReporter);
Working with ExtentTest to Log Stuff
Time to introduce the ExtentTest class into the code. We use the instance of this class to log reports. We will make use of log() method and createTest() method to gather reports at places required.
Step 11: Type the following for Logging something into the reports:
logger = report.createTest("CheckURLStatus");“CheckURLStatus” is nothing but the name of the test case that I have given for my report.
We will use the createTest method of ExtentReports class to start using the ExtentTest object.
Step 12: Type the following in your existing code:
logger.log(Status.INFO, "Starting Browser instance...");
Status might throw an error. Just import the following package to take care of that:
import com.aventstack.extentreports.Status;
As you can see we are logging in a message called “Starting Browser instance…” before the browser instantiates.
This log would be helpful in understanding what all procedure happened and in which order. You can, of course, use it as per your coding requirement.
I have used it right before starting the browser instance before instantiating ChromeDriver().
Other Log Statuses
Status has all these other log statuses that you could use as well:

I will put another one right before opening Google’s site too.
Step 13: Type in another log like this:
logger.log(Status.INFO, "Opening Google now...");
Step 14: After the google’s URL opens, you want to retrieve a final Pass or Fail log as well.
For that type the following log line before driver.get(“http://www.google.com”);
logger.log(Status.PASS, "Google opens successfully!");
As you can see we have used the status as PASS here. The message should be reflected in green.
Step 14: We should always close the report by using report.flush() method. Just type that as the end line:
report.flush();
So our whole code would look something like this:

Step 15: Run this baby!
Let the magic happen.
Result of the Extent Report HTML file
When you run the above program you will receive the output in this cool graphic format:

One of the coolest Selenium Reporting Tools, huh!
As you can see it records all the logs that we had mentioned in our code. The INFO files have a symbol of:

While the Status.PASS will result in a Pass symbol of a tick mark that displays in green:

On the left you can notice the name we had specified in the createTest method. If there were many test cases in our code the left hand side would have had that. We could have got a better perspective of how many test cases passed or failed.
There is also a filter mechanism on the top left hand side corner. Here we can filter all those cases that have passed or failed and look into those that we wish to deal with:

Of course in the image above we just have a Pass method and hence that argument is invalid.
So how does the red look like? When your test case fails you get a report that indicates the failed test case in red.
Let’s fail it deliberately and see the report:

Pretty cool huh!
The Status.FAIL has been represented by a red cross with the relevant message:

So now that you know How to Generate Extent Report in Selenium, isn’t Extent Report one of the best Selenium Reporting Tools out there?
Is there any doubt in that?
Check out other Selenium Tutorials as well.


Hi,
Thanks a lot for the valuable tutorial on the Extend reporting with Selenium. Actually i have 10 test method and in each i had called Main class which has 5-6 sub classes. Could you please guide me how i should do it for my project? whether if i mention the above mentioned in before and after suite is enough or do i need to mention these each and every class?
Eagerly waiting for a reply.
Thanks in advance!
No need to mention it in each and every class. You can create one Extent Reports class and define some methods for INFO, PASS, FAIL, ERROR etc. Then you can simply any of the required methods where you wish to see the log.
Hope that helps!
– Scottshak
Hi,
Extent report is getting generated, but while pushing in gitlab and running pipeline, the report doesn’t get generated in the artifacts folder. Could you help me with it